by Maetion Software
PlayMaetion was designed to help Scottish Country Dance teachers manage their pre-recorded music. In the typical scenario, the instructor would first decide which dances they want to teach. Then they would use PlayMaetion to find, organize, and play the appropriate music for the class.
In practice, the teacher will have a USB flash drive that contains their entire iTunes library. They will plug this flash drive into their Android tablet and start PlayMaetion. Next they use the 'Find iTunes' command to connect the two systems. PlayMaetion will essentially 'join' the two databases based on the dances 'recommended music'. This creates the 'All Dances' spreadsheet, which includes access to playing the tunes.
PlayMaetion has a music player built into it with some special features:
PlayMaetion requires Android 3.2 and as a practical matter you will need a tablet sized display. I have been targeting 7" and up.
This documentation is divided into five sections:
The application command menus are located at the top right of the screen. Two of the menus are labeled 'View' and 'Playlist'. There is a third menu item, 'Find iTunes', represented by three vertical dots. Just tap on these items to see the options. To dismiss the dropdown menu, just tap the menu header again.
This is a top level navigation menu. The options on the 'View' menu are:
The items on this menu control which playlist you are working on. You are in charge of creating and load playlists. See the section on unique Playlist features to learn more about their implementations.
The 'New' menu command will create a new playlist. A dialog will be presented and you will be prompted to name the playlist. Type in a name and press 'Ok'. If the name you choose corresponds to an already existing file, you will be asked to confirm the file replacement.
Playlists are saves as CSV file types but you do not need to add the ".csv" file extension when naming a playlist.
The 'Load' command will present you with a dialog that includes a dropdown menu of all the available playlists. Select one and press 'Ok".
The 'Save As' command will present a dialog asking you to rename the current playlist. Type in a name and press 'Ok'. If the name you entered corresponds to file that already exists, you will be asked to confirm the replacement. The current displayed playlist will be saved to this name.This command scans the mounted storage devices on your tablet looking for a top level directory named "iTunes". It will present a dialog that lists all the candidates that have been found. Select one and press 'Ok'.
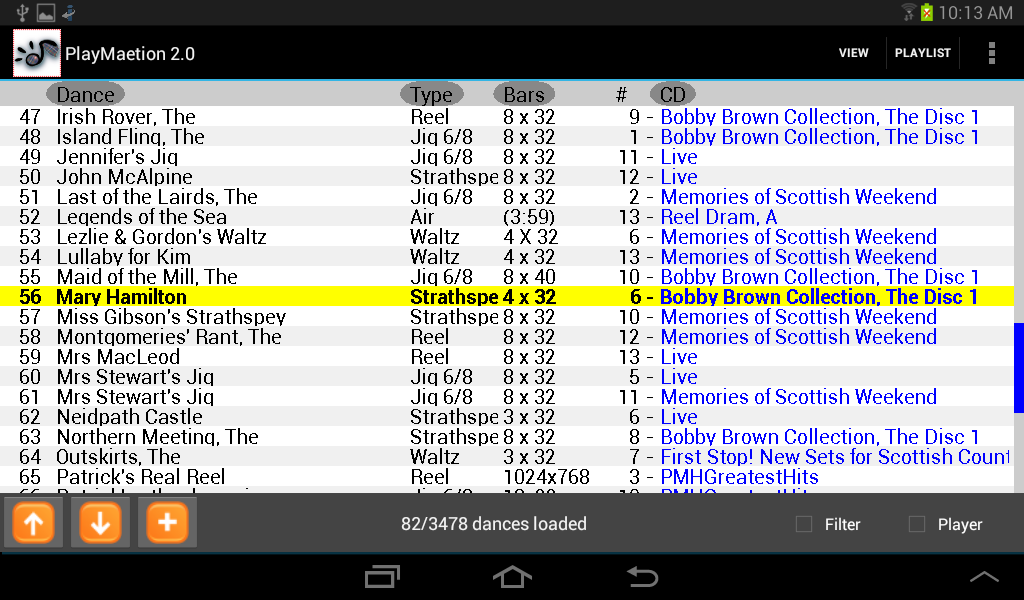
Although they have different purposes, the All Dances and Playlist views have many things in common. Both views display the same dance information, have the same scrolling behavior, and can access the tune player and command bar.
Both view display the same tabular information. From left to right:
If the dance name starts with the word "The", usually that is displayed with the "..., The" at the end of the display name.
On narrow tablet displays (portrait orientation) the dance type may be abbreviated to a few letters.
Sometimes the Bar field contains the play duration (min:sec) in parenthesis. For some medleys the Bar description can get cryptic; good luck.
If the recommended tune for the dance is accessible via the connected iTunes library the CD name field is written in blue.
You can scroll through the displayed set of dances by touching the screen an moving your finger up and down. PlayMaetion supports four different styles/speeds of scrolling. Which one you get depends on where you put your finger down.
The scroll bar is at right edge of the screen. The size of the dark blue line represents the 'viewport' onto the list of dances. The scroll bar area is touch sensitive by about 1 finger's width. When you touch down, the viewport will scroll to the relative position of your touch. When you move your finger up or down the you move the viewport on the rows.
The row counter is on the left edge of the screen. It is also touch sensitive by about one finger's width. When you touch down on a row number, that row becomes selected. As you move your finger up or down that row moves up and down in tandem (stays under your finger).
If you place your finger down just to the right of the center you will engage 10x scrolling. The rows move up and down with your finger, but they moves much faster than your finger. Looking at row #1, if you scroll down with ten full swipes of the screen you should be at the bottom.
Similar to 10x scrolling, but place your finger down just to the left of center. If you are looking at row #1, it will take 20 full swipes of the screen to reach the last row.
The Command bar appears below the dance spreadsheet. Some of the contents of the command bar changes depending on which dance view is displayed.
Icons Buttons on the left:
In the middle of the command bar is the 'Status Text' display.
Checkboxes are displayed on the right-hand side of the command bar. These options control whether sub panels are displayed.
Even if the Filter panel is not displayed, the All Dances view still uses the filter.

At the top of the player panel is the CD and Track number of the selected tune.
To the left of the Play button are the Delay-Start and Slow-Down options. When you press the Play button it looks at these options and acts accordingly. Changing these options while the music is playing or paused has no affect.
When you press the 'Play' button the music will start, it's caption will change to 'Stop', and the button next to it, 'Pause', will become enabled.
If the music is played to completion (you don't press the Stop button) and the 'Continuous Play' item is checked, then the next tune in the spread sheet (All Dances or Playlist) which has available music will start playing.
To the left of the Progress Bar is the 'Queue' button. You can program the Queue button to go to a specific spot in the music. The default position is the beginning of the tune. To change the queue position, move the progress slider to where you want the queue to be, then press and hold the Queue button (for about 1 and 1/2 seconds). The new queue position will be displayed in the Queue button caption.
The purpose of the All Dances view is to help you build a playlist. The hope is that by using filtering and sorting you will be able to quickly find the dances and tunes of interest and add them to a playlist.
The purpose of the Playlist is to be a concise and referable (saved by name) set of Dances/Tunes.
The goal is to produce a playlist. So the first thing you should do is create a playlist (menu command Playlist/New).
The next thing you should probably do is filter the set of displayed dances down to those which you have music for. Go to the All Dances view and check the 'Filter' box in the command bar. In the Filter panel, check 'Music must be accessible', and then press 'Apply Filter'.
In the 'All Dances' view sort the rows according to the dance name (tap on the "Dance" column
header). Look for
each dance in your lesson plan. Hopefully you find the dance and possibly
a selection of music to choose from. If so, you could add each of those
entries to the playlist (press the
![]() command button).
command button).
If your dance is not there you have a number of ways to proceed. For example, if you wanted music for a 32 bar jig, you could use filtering and limit the set of displayed dances to those which are "Jig" and whose bar count is "x 32". You could follow that up by sorting by Bars which would order the display by tune's repetition count.
If you don't find any good choices , you may want to uncheck 'Music must be accessible' and consider buying some of the listed CDs.
You can of course play tunes. Check the 'Player' box in the command bar. The selected dance in the spreadsheet will automatically have it's recommended music queued in the player.
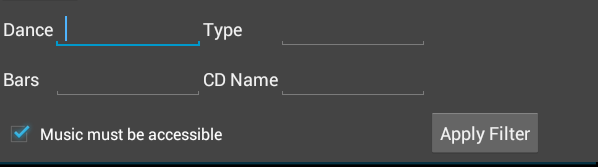
When the All Dances view is displayed, check the Filter checkbox in the command bar. You may specify a search strings for each of the columns:
When the filter is applied the specified string must be contained in the dance column. The test is letter case sensitive.
There is also the 'Music must be accessible' checkbox. That means we must be able to find an entry for the recommended tune in the iTunes library.
When you press the 'Apply Filter' button the application goes back to the complete set of dances (no filtering on filtering) and looks for dances/rows which pass all of the tests (a logical And test).
The amount of information in the 'All Dances' table is just to unwieldy. The purpose of the Playlist is to provide a concise list of the rows you care about and to let you name the collection and reload it later.
Playlists are created and loaded through the Application Menu interface.
| All playlists are kept on the tablet's internal storage under
the PlayMaetion/Playlist/ directory. They are saved in Comma
Separated Variable (CSV) format and the file extension is always "*.csv" and the file name
is the playlist name. So the rules for naming a playlist are the
same as naming a file. When you are developing a playlist, all changes are saved immediately. Therefore, there is no 'Save' command. If you are going to make a playlist that is a derivative of another, load the original playlist first and before you make any changes, use the Save As command to save the current list to a new name. |
To add a row to a playlist, find the dance of interest in the All Dances
view, select it, and then press the
![]() add
button on the command bar.
add
button on the command bar.
To remove a row from a playlist, select the row to delete and then press the
![]() delete
button on the command bar.
delete
button on the command bar.
To change the ordering of rows in the playlist, select a row to move and
press the
![]() move
up or
move
up or
![]() move
down button in the command bar.
move
down button in the command bar.
Remember, changes to Playlists are saved as you go.
This file is located at the top level in the iTunes directory. It is very carefully maintained by the iTunes software. In particular, it is synchronized to report on all the music you have purchased, ripped, imported into iTunes. Lots of good information here but very technically formatted.
Don't bother editing this file because iTunes will overwrite it the next chance it gets.
The SCD_Index.csv is a data file that contains information about many Scottish Country dances; +3400 at last count. It is the backbone of this application. It is located on your tablet's internal storage in the PlayMaetion directory.
Ideally there would be a master version of this file that is administered world wide. PlayMaetion could then get occasional updates to learn about new dances and music.
We have a start at this program that we use internally. If PlayMaetion takes-off we may step up to maintain the dataset. Until then you can edit the SCD_Index.csv file yourself...just be careful. If things get messed-up, just delete delete the file and PlayMaetion will restore the original version the next time it starts.
let me know how things go
patrickH
Support@ImaginationProcessing.com